To find the serial or model number of your computer, check the bottom or back of the device for a sticker or engraved label. The number may also be found in the system settings or BIOS menu. If you’re having trouble locating the serial or model number, don’t worry! You can select your device’s brand below and find detailed instructions and diagrams to help you find the information you need.
As technicians at SureCanDo Computer Services, we understand the importance of identifying the devices our clients bring in for repair or upgrades. That’s why we always ask for the serial number or model number of the device before we start any work. This information helps us to provide accurate quotations and ensure that we use the correct parts and software to get your device up and running as quickly as possible.


Find Your Serial or Model Number Quickly: Popular Brands
Every ACER computer has a product number, unique serial number and a SNID number.
Locating ACER Laptop Serial Number and SNID Number
- Download and run the Serial Number Detection tool
- Both serial number and SNID will be displayed.
- Press the Windows key
- Type care center and press Enter.
- Both serial number and SNID will be displayed in the application.
- Double-click the Acer Identity Card icon available on the desktop.
- Both Serial number and SNID code will be displayed.
Locating ACER Laptop & PC Serial Number via BIOS Settings
Here are the steps to access the BIOS on an ACER laptop:
- Turn on your Acer laptop and immediately press the F2 key repeatedly until the BIOS screen appears.
- Once you’re in the BIOS, use the arrow keys to navigate to the “Main” tab.
- Look for the “System Serial Number” or “Serial Number” field on the screen. The location of this field may vary depending on your laptop model and BIOS version.
- Write down the serial number or take a photo of the screen.
By following these steps, you should be able to access the BIOS on your ACER laptop and find your serial number.
Locating ACER Desktop Serial Number and SNID Number
- Download and run the Serial Number Detection tool
- Both serial number and SNID will be displayed.
- Press the Windows key
- Type care center and press Enter.
- Both serial number and SNID will be displayed in the application.
- Doubleclick the Acer Identity Card icon available on the desktop.
- Both Serialnumber and SNID code will be displayed.
Locating ACER Tablet Serial Number and SNID Number

Older tablets may have the SNID or serial number label on the underside of the MicroSD/SIM card cover. If you are unable to locate a physical serial number label, you can find this information in the tablet operating system. Use the following steps to to retrieve the SNID or serial number within the operating system:
- Use Acer Care Center to locate your serial number.
- From the Home Screen, tap on Apps, and then Settings.
- Tap on About Tablet, and then Device Information.
- Both serial number and SNID will be displayed in the application.
- Doubleclick the Acer Identity Card icon available on the desktop.
- Both Serialnumber and SNID code will be displayed.
- Download and run the Serial Number Detection tool
- Both serial number and SNID will be displayed.
- Press the Windows key
- Type care center and press Enter.
- Both serial number and SNID will be displayed in the application.
- Double-click the Acer Identity Card icon available on the desktop.
- Both Serialnumber and SNID code will be displayed.
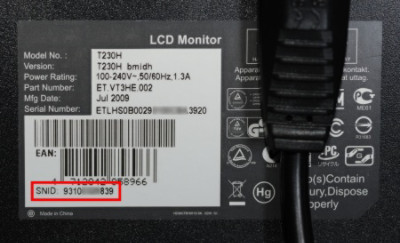
Locating ACER Monitor Serial Number and SNID Number
Every APPLE devices has a product number and a unique serial number.
Depending on the product, you can find its serial number in one or more of these ways:
- Check the surface of your product for a printed serial number.
- On Mac, choose Apple menu > About This Mac.
- On iPhone, iPad, iPod touch or Apple Watch, go to Settings > General > About.
- If you use the Finder or iTunes to sync your device with your computer, plug your device into your computer, then select your device in the Finder or iTunes.
If you don’t have your product or it won’t turn on
If you have your product’s original packaging, you can check the barcode to find the serial number. You can also find your product’s serial number on the original product receipt or invoice. Or choose a product below for details about finding the serial number.
The format of the serial number for Apple computers can vary depending on the model and the year of manufacture. However, generally, Apple serial numbers are 12 to 17 characters long and consist of both letters and numbers. Here’s an example of how an Apple serial number might be formatted:
” C02QD12FG5VN ”
The first three characters of an Apple serial number typically indicate the manufacturing location and year of production, while the fourth and fifth characters indicate the week of production. The remaining characters are a unique identifier for the specific device.
Locating Apple MacBook Air & MacBook Pro Serial Number and Model Number
To find the serial number or model number of a MacBook, you can follow these steps:
- Click on the Apple menu () in the top left corner of your screen.
- Select “About This Mac” from the drop-down menu.
- A window will appear that displays information about your MacBook, including the model name and the serial number.
- The model name will be listed under “Model Name” and the serial number will be listed under “Serial Number.”
Alternatively, you can find the serial number printed on the bottom of your MacBook or on the original packaging it came in. The model number can also be found on the bottom of your MacBook or on the original packaging. It typically starts with the letter “A” followed by four digits.
There are a few other ways to find the serial number or model number of a MacBook:
- System Information: You can access detailed information about your MacBook by opening the “System Information” app. To do this, click on the Apple menu () in the top left corner of your screen, then select “About This Mac,” and then click on “System Report.” In the System Information window, look for “Hardware Overview” on the left-hand side. The model name and serial number will be listed here.
- Command Line: You can also use the Terminal app to find the serial number of your MacBook. To do this, open the Terminal app (which can be found in the Utilities folder within the Applications folder), and type the following command: “system_profiler SPHardwareDataType | awk ‘/Serial/ {print $4}'”. Press Enter, and your MacBook’s serial number will be displayed.
- Apple Support: If you’ve lost your MacBook’s serial number and can’t find it using any of the above methods, you can contact Apple Support for assistance. They will likely ask you to provide proof of purchase or other identifying information to verify that you are the owner of the device before providing you with the serial number.
Locating Apple iMac Serial Number and Model Number
You can find the serial number and model number of an iMac in several ways, including:
- About This Mac: Click on the Apple logo in the top-left corner of the screen and select “About This Mac.” The window that appears will display the model name, such as “iMac (Retina 5K, 27-inch, 2019)” and the serial number.
- System Information: Click on the Apple logo and select “System Information.” In the window that appears, select “Hardware” from the left-hand column and look for the model identifier, such as “iMac19,1,” which can be used to identify the model. The serial number is also listed in this window.
- On the physical device: The serial number is typically printed on the bottom of the iMac stand or on the back of the iMac near the ports. The model number may also be printed on the device.
- Command Line: You can also use the Terminal app to find the serial number of your MacBook. To do this, open the Terminal app (which can be found in the Utilities folder within the Applications folder), and type the following command: “system_profiler SPHardwareDataType | awk ‘/Serial/ {print $4}'”. Press Enter, and your MacBook’s serial number will be displayed.
- Apple Support website: If you have an Apple ID, you can log in to the Apple Support website and view information about your registered devices, including the serial number and model number of your iMac.
- Original packaging: If you still have the original packaging for your iMac, the serial number and model number are usually printed on the box.
Locating Apple Mac Mini Serial Number and Model Number
To find the serial number or model number of your Mac Mini, follow these steps:
- Click on the Apple logo in the top-left corner of your screen.
- Select “About This Mac” from the dropdown menu.
- In the window that appears, you should see the model name listed (e.g., “Mac Mini (Late 2014)”).
- To find the serial number, click on the “Overview” tab, and then click on the “System Report” button.
- In the System Information window, scroll down to the “Hardware” section, and you should see the serial number listed.
Alternatively, you can also find the serial number on the bottom of the Mac Mini. Simply turn the device over and look for the label with the serial number printed on it.
Command Line: You can also use the Terminal app to find the serial number of your MacBook. To do this, open the Terminal app (which can be found in the Utilities folder within the Applications folder), and type the following command: “system_profiler SPHardwareDataType | awk ‘/Serial/ {print $4}'”. Press Enter, and your MacBook’s serial number will be displayed.
Every ASUS computer has a product number and unique serial number.
Locating ASUS Laptop Serial Number Outside the Device
To find the serial number of your ASUS laptop, there are a few easy methods. Firstly, you can locate the serial number on the original packaging or receipt that came with your laptop. Secondly, you can look for a sticker on the bottom of your laptop that displays the serial number. This sticker may also include other information such as the model number and other important details about your laptop.
- Documentation: The laptop’s user manual, warranty card, or other documentation that came with the laptop may have the serial number printed on it.
- Original Packaging: If you still have the original packaging that the laptop came in, the serial number may be printed on the box or on a label attached to it.
- Manufacturer’s Website: You can also try checking the manufacturer’s website, as they may have a section where you can enter your laptop’s model number to find its serial number.
Locating ASUS Laptop Serial Number via Windows Operating System
You can also find the serial number by going to the system settings on your laptop and looking for the “About” section. Here, you should be able to find the serial number listed along with other important information about your ASUS laptop.
To find the serial number of your laptop in Windows, you can follow these simple steps:
- Press the Windows key + X on your keyboard to open the Power User menu.
- Click on “Command Prompt” or “Windows PowerShell” from the list of options.
- In the Command Prompt or PowerShell window, type the following command: wmic bios get serialnumber
- Press Enter on your keyboard.
- Your laptop’s serial number should now be displayed on the screen.
Alternatively, you can also find your laptop’s serial number by going to the “System Information” window in Windows. To do this, follow these steps:
- Press the Windows key + R on your keyboard to open the Run dialog box.
- Type “msinfo32” in the text field and press Enter.
- The System Information window should now open.
- Look for the “System Model” or “System SKU” field in the right-hand pane.
- Your laptop’s serial number should be listed next to the System Model or System SKU field.
By using either of these methods, you should be able to easily find the serial number of your laptop in Windows.
Locating ASUS Laptop Serial Number via BIOS Settings
Here are the steps to access the BIOS on an ASUS laptop:
- Turn off your laptop completely.
- Press the power button to turn it on and immediately start pressing the “F2” key on your keyboard. Keep tapping the “F2” key repeatedly until the BIOS setup utility appears.
- Alternatively, you can try pressing the “Delete” key instead of “F2”. Some ASUS laptops use the “Delete” key to access the BIOS setup utility.
- If neither of these keys work, you can try pressing the “Esc” key or the “F9” key instead. Some ASUS laptops use these keys to access the boot menu, which may also have an option to enter the BIOS setup utility.
- Once you successfully enter the BIOS setup utility, you can use the arrow keys on your keyboard to navigate through the different options and settings. Be careful not to change any settings unless you know what you’re doing, as this can cause problems with your laptop’s performance or functionality.
- When you’re finished making any changes in the BIOS, be sure to save your settings before exiting. To do this, look for an option to “Save and Exit” or “Exit and Save Changes”. Press the appropriate key to save your settings and exit the BIOS setup utility.
By following these steps, you should be able to access the BIOS on your ASUS laptop and find your serial number.
Every Chromebook computer has a product number and unique serial number.
To find your Chromebook’s serial number, you can check:
- The bottom of your Chromebook.
- The device box.
- Find ‘S/N’ and the number that follows it.
Tip: On your Chromebook sign-in screen, press Alt + V. Your serial number appears on screen after ‘SN’.
There are a few other ways to find the serial number or model number of a Chromebook, depending on the device and operating system. Here are some options:
- Use the Chromebook’s settings: Click on the time in the bottom-right corner of the screen, then click on the gear icon to access the settings menu. Scroll down to “About Chrome OS” and click it. You should see the model number and other information about your Chromebook, including the current version of Chrome OS.
- Use the command prompt: Press Ctrl+Alt+T to open the Crosh (Chrome OS Developer Shell) prompt. Type “system_profiler” and press Enter. This will give you detailed information about your Chromebook, including the serial number and model number.
- Use the Chromebook Recovery Utility: If you’ve created a recovery drive for your Chromebook, the model number and serial number will be included in the file name.
Every Dell computer has a product number and System Service Tag (serial number).
To find the serial number or model number of a Dell computer, you can follow these steps:
- Look for the Service Tag: The Service Tag is a unique identifier that Dell assigns to each computer. It is usually a 7-character alphanumeric code and can be found on a sticker on the back or bottom of the computer.
- Check the BIOS: Restart your Dell computer and press the F2 key during the boot process to access the BIOS setup utility. Once you’re in the BIOS, look for the System Information or System Setup section. Here you should be able to find the model number and other information about your computer.
- Check the Dell Support website: You can also find information about your Dell computer by visiting the Dell Support website. Go to www.dell.com/support, click on the “Detect PC” button, and follow the prompts to automatically detect your computer’s model and serial number.
- Check the original packaging: If you still have the original packaging for your Dell computer, the model number and serial number should be printed on the box.
These are some of the ways you can find the serial number or model number of a Dell computer.
Here are a few more ways to find the serial number or model number of a Dell computer:
- Check the invoice or receipt: If you purchased the Dell computer from a retailer or directly from Dell, the serial number and model number should be listed on the invoice or receipt.
- Use Command Prompt or PowerShell: You can also find the model number and serial number of your Dell computer by using Command Prompt or PowerShell. Open the Command Prompt or PowerShell by pressing the Windows key + R, then typing “cmd” or “powershell” and hitting Enter. Then type the following command and hit Enter:wmic csproduct get name, identifyingnumberThis should display the model number and serial number of your Dell computer.
- Use Dell System Detect: Dell System Detect is a tool that can be downloaded from the Dell Support website. It scans your computer and provides detailed information about its hardware, including the model number and serial number.
- Check the Dell SupportAssist app: If you have the Dell SupportAssist app installed on your computer, you can use it to find the model number and serial number. Open the app and go to the “Devices” tab to view your computer’s details.
You can also use the “wmic” command to find the serial number and model number of a Dell computer. Here are the steps:
- Open Command Prompt: Press the Windows key + R, then type “cmd” and hit Enter.
- Type the command: In the Command Prompt window, type the following command and hit Enter:wmic csproduct get name, identifyingnumber
- View the results: The command will display the model number and serial number of your Dell computer.
Note that you can also use this command to find the serial number and model number of other types of computers and devices, as long as they support the Windows Management Instrumentation (WMI) protocol.
The format of the serial number for Dell computers can vary depending on the age of the computer and the type of device. Here are a few common formats:
- Older Dell computers often have a 7-character alphanumeric service tag that is unique to each device. This service tag can be found on a sticker located on the back or bottom of the computer.
- Newer Dell computers may have a longer service tag that includes both letters and numbers, as well as a 5- or 6-digit express service code. The service tag and express service code can be found on a sticker located on the back or bottom of the computer.
- Some Dell computers may have a serial number that is located in the system BIOS or UEFI firmware. To access this information, you can restart the computer and press the F2 key when the Dell logo appears. This will take you to the BIOS or UEFI settings, where you can find the serial number listed under the “System Information” or “Asset Tag” section.
Every HP computer has a product number and unique serial number.
HP Laptops & Notebook Computers
You can typically find the serial number of an HP laptop on the bottom of the device, on a sticker or engraved into the plastic. Alternatively, you can press the “Fn” and “Esc” keys together to open the HP System Information window, which will display the serial number along with other system information. If your laptop is not accessible or you are having difficulty finding the serial number, you can also check the original packaging, the invoice, or contact HP support for assistance.
On the bottom of the notebook

Inside the battery compartment

On the box that the notebook shipped in

On the kickstand

Find product and serial numbers with HP Support Assistant

Find product and serial numbers with the HP System Information app

HP Desktops, All in One & Workstations
To find the serial number of an HP desktop, you can look for a sticker on the back, side, or bottom of the device. Alternatively, you can use the Command Prompt or the BIOS settings to retrieve the serial number. To use the Command Prompt, type “wmic bios get serialnumber” into the search bar, and the serial number will be displayed. To access the BIOS settings, restart the computer and press the appropriate key (usually F2, F10, or Del) to enter the BIOS setup, where the serial number should be listed in the System Information section.
On the side of the case

On the top or rear of the case

On the front or side of the case

HP All-In-One PC
On the center of the back of the computer

HP All-In-One PC
On the lower corner of the back of the computer

HP All-In-One PC
On the upper corner of the back of the computer

HP All-In-One Curved PC
1. Locate the label tab on the bottom edge of the back of the computer.

HP All-In-One Curved PC
2. Grasp the tab, pull down firmly until the product label is visible, and then continue to gently pull the label toward the front of the computer until it is fully extended.

On the box that the computer shipped in

Find product and serial numbers with the HP System Information app
Find product and serial numbers with HP Support Assistant
HP Servers
You can usually find the serial number of an HP server on a sticker or tag located on the chassis of the server. The exact location may vary depending on the specific model, but it is often found on the rear of the server near the power supply or on the top or side of the server. Alternatively, you can find the serial number in the system BIOS or through the iLO (Integrated Lights-Out) web interface. To access the BIOS, restart the server and press the designated key during startup to enter the BIOS setup utility. In the iLO web interface, the serial number can be found under the “Information” tab.
Every Lenovo computer has a product number and unique serial number.
You can find the serial number or model number of a Lenovo computer using one of the following methods:
- Look for a sticker on the bottom or back of your Lenovo computer. The sticker will usually have the serial number and model number printed on it.
- Check the BIOS of your Lenovo computer. To do this, restart your computer and press the appropriate key to enter the BIOS setup utility (usually F1 or F2). Once in the BIOS, look for information about your computer’s model number and serial number.
- Use the Windows System Information tool. To do this, open the Start menu and type “System Information” in the search bar. Open the System Information tool and look for information about your computer’s model number and serial number.
- Use the Lenovo Vantage software. Lenovo Vantage is a free application that comes preinstalled on most Lenovo computers. Open Lenovo Vantage and look for information about your computer’s model number and serial number in the “Device Info” section.
- Look for the original packaging or invoice that came with your Lenovo computer. The serial number and model number are usually printed on the box or invoice.
- Check the Lenovo website. Lenovo provides a “Detect Product” tool that can automatically identify your Lenovo computer and provide information about its model number and serial number. To use this tool, visit the Lenovo support website and click on “Detect Product” under the “Support” menu.
Note that the exact steps may vary depending on the specific Lenovo computer model and operating system version.
The format of the serial number for Lenovo computers may vary depending on the model and age of the computer. However, most Lenovo serial numbers are 10 characters long and consist of both letters and numbers.
For newer Lenovo computers (manufactured after 2015), the serial number typically starts with “R90” or “R91” and is followed by a series of 8 digits. The serial number may be located on a sticker on the bottom of the computer, or it may be accessible through the BIOS or UEFI firmware settings.
For older Lenovo computers, the serial number may be located on a sticker on the bottom of the computer, or it may be located on the back of the computer near the ports. The serial number may be shorter than 10 characters and may not follow a specific format.
Every Microsoft computer has a product number and unique serial number.
There are a few ways to find the serial number or model number of a Microsoft Surface computer:
- Look on the device itself: The serial number and model number are typically printed on a sticker located on the back of the device, near the bottom.
- Check the packaging: If you still have the original packaging for your Surface computer, the serial number and model number may be printed on the box.
- Use the Settings app: On your Surface computer, go to Settings > System > About. The model name and number should be listed under the “Device specifications” section, while the serial number should be listed under the “Device ID” section.
- Use the Command Prompt: Open the Command Prompt by pressing the Windows key + X and selecting “Command Prompt” from the menu. Type “wmic bios get serialnumber” and press Enter. The serial number of your Surface computer should be displayed.
- Use the PowerShell: Open PowerShell by pressing the Windows key + X and selecting “Windows PowerShell” from the menu. Type “Get-CimInstance Win32_ComputerSystem | Select-Object Model” and press Enter. The model name and number of your Surface computer should be displayed.
- Use the UEFI firmware: Restart your Surface computer and press and hold the Volume Up button while it boots up. This will take you to the UEFI firmware settings. From there, navigate to the “System Information” or “Device Information” page, where you should be able to find the serial number and model number.
- Use the Microsoft Surface app: If you have the Microsoft Surface app installed on your Surface computer, you can open the app and go to the “Device details” section to find the serial number and model number.
- Use the Windows Device Manager: Open the Device Manager by right-clicking on the Start button and selecting “Device Manager” from the menu. Expand the “System devices” section and look for “Surface UEFI” or “Surface System Aggregator”. Double-click on the device to open its properties, and then go to the “Details” tab. Select “Hardware Ids” from the drop-down menu, and you should be able to find the serial number and model number in the values listed.
The format of the serial number for Microsoft Surface devices varies depending on the model and generation of the device. However, in general, the serial number for Microsoft Surface devices is a 12-digit alphanumeric code that includes a combination of letters and numbers. The serial number is usually located on a sticker on the back of the device or on the device packaging, and may also be displayed in the device settings or firmware.
For example, for Microsoft Surface Pro 7, the serial number is a 12-digit code starting with “07” and followed by a mix of letters and numbers, such as “07ABCD123456”. For Microsoft Surface Laptop 4, the serial number is also a 12-digit code starting with “08” and followed by a mix of letters and numbers, such as “08EFGH789012”.
Every Toshiba & Dynabook computer has a product number and unique serial number.
The location of the serial number and model number of a Toshiba computer may vary depending on the model and age of the computer. However, here are some common methods to find the serial number and model number of a Toshiba computer:
Look for a sticker on the bottom of the computer: Most Toshiba laptops have a sticker on the bottom of the case that displays the model number and serial number.
Check the computer’s documentation: The model number and serial number of the computer may also be listed on the original documentation that came with the computer.
Use Toshiba’s support website: Toshiba provides an online tool called “System Information” that can be used to find the model number and serial number of your computer. You can download and run this tool from the Toshiba support website.
Check the BIOS: The model number and serial number may also be listed in the computer’s BIOS. To access the BIOS, restart your computer and press the appropriate key to enter the BIOS setup utility. The key to access the BIOS may vary depending on the computer model.
Use the Command Prompt or PowerShell: You can use the Command Prompt or PowerShell on a Windows computer to find the model number and serial number of a Toshiba computer. Open the Command Prompt or PowerShell and type “wmic csproduct get name, identifyingnumber” and press enter. This will display the model number and serial number of your computer.
Check the box or receipt: If you have the original box or receipt of the Toshiba computer, the model number and serial number may be listed on it.
Look for a label inside the battery compartment: Some Toshiba laptops have a label inside the battery compartment that displays the model number and serial number.
Use a third-party system information tool: There are many third-party system information tools available that can be used to find the model number and serial number of a Toshiba computer. Some popular examples include Speccy, CPU-Z, and HWiNFO.
Dynabook is a brand of laptop computers that was originally created by Toshiba in 1989. In 2018, Sharp Corporation acquired Toshiba’s PC business and changed the name of the laptop brand from Toshiba to Dynabook. Since then, Dynabook has continued to manufacture and sell laptops under the Dynabook brand.
Dynabook laptops are designed for business and professional use, and are known for their high performance, durability, and security features. The laptops are available in a range of models, including traditional clamshell designs, 2-in-1 laptops, and thin and light models.
Dynabook also offers a range of services and solutions to support their laptops, including security software, remote management tools, and warranty and repair services.